使用SD转接头打印串口信息
引言
SD卡,作为一种常见的存储设备,被广泛应用于手机、相机和其他电子设备。然而,在幽兰上,除了用来接存储数据的MicroSD卡,SD口还可以用来做内核调试和串口打印,具备令人惊讶的扩展功能。在本文中,我们将探索使用SD转接头的一种强大扩展玩法——串口功能,它为我们提供了一个简单而强大的方式来与其他设备进行通信和交互。
什么是串口功能?
串口是古老的通信机制,因为简单方便,使其成为与其他设备进行通信的理想选择。通过串口,我们可以让幽兰连接各种外部设备,如普通PC、单片机、传感器、无线模块等,实现数据的传输和交互。
使用幽兰代码本与所需工具,按以下步骤,开始我们的学习串口通讯之旅吧!
1. 硬件清单
格蠹SD卡转接板 x1
公对公杜邦线 x3
串口转接板 x1
上位机(windows/linux) x1
幽兰代码本 x1
2. 连线
想要查看串口输出,首先要将SD卡转接板和串口转接板进行连接,连接示意图如下所示。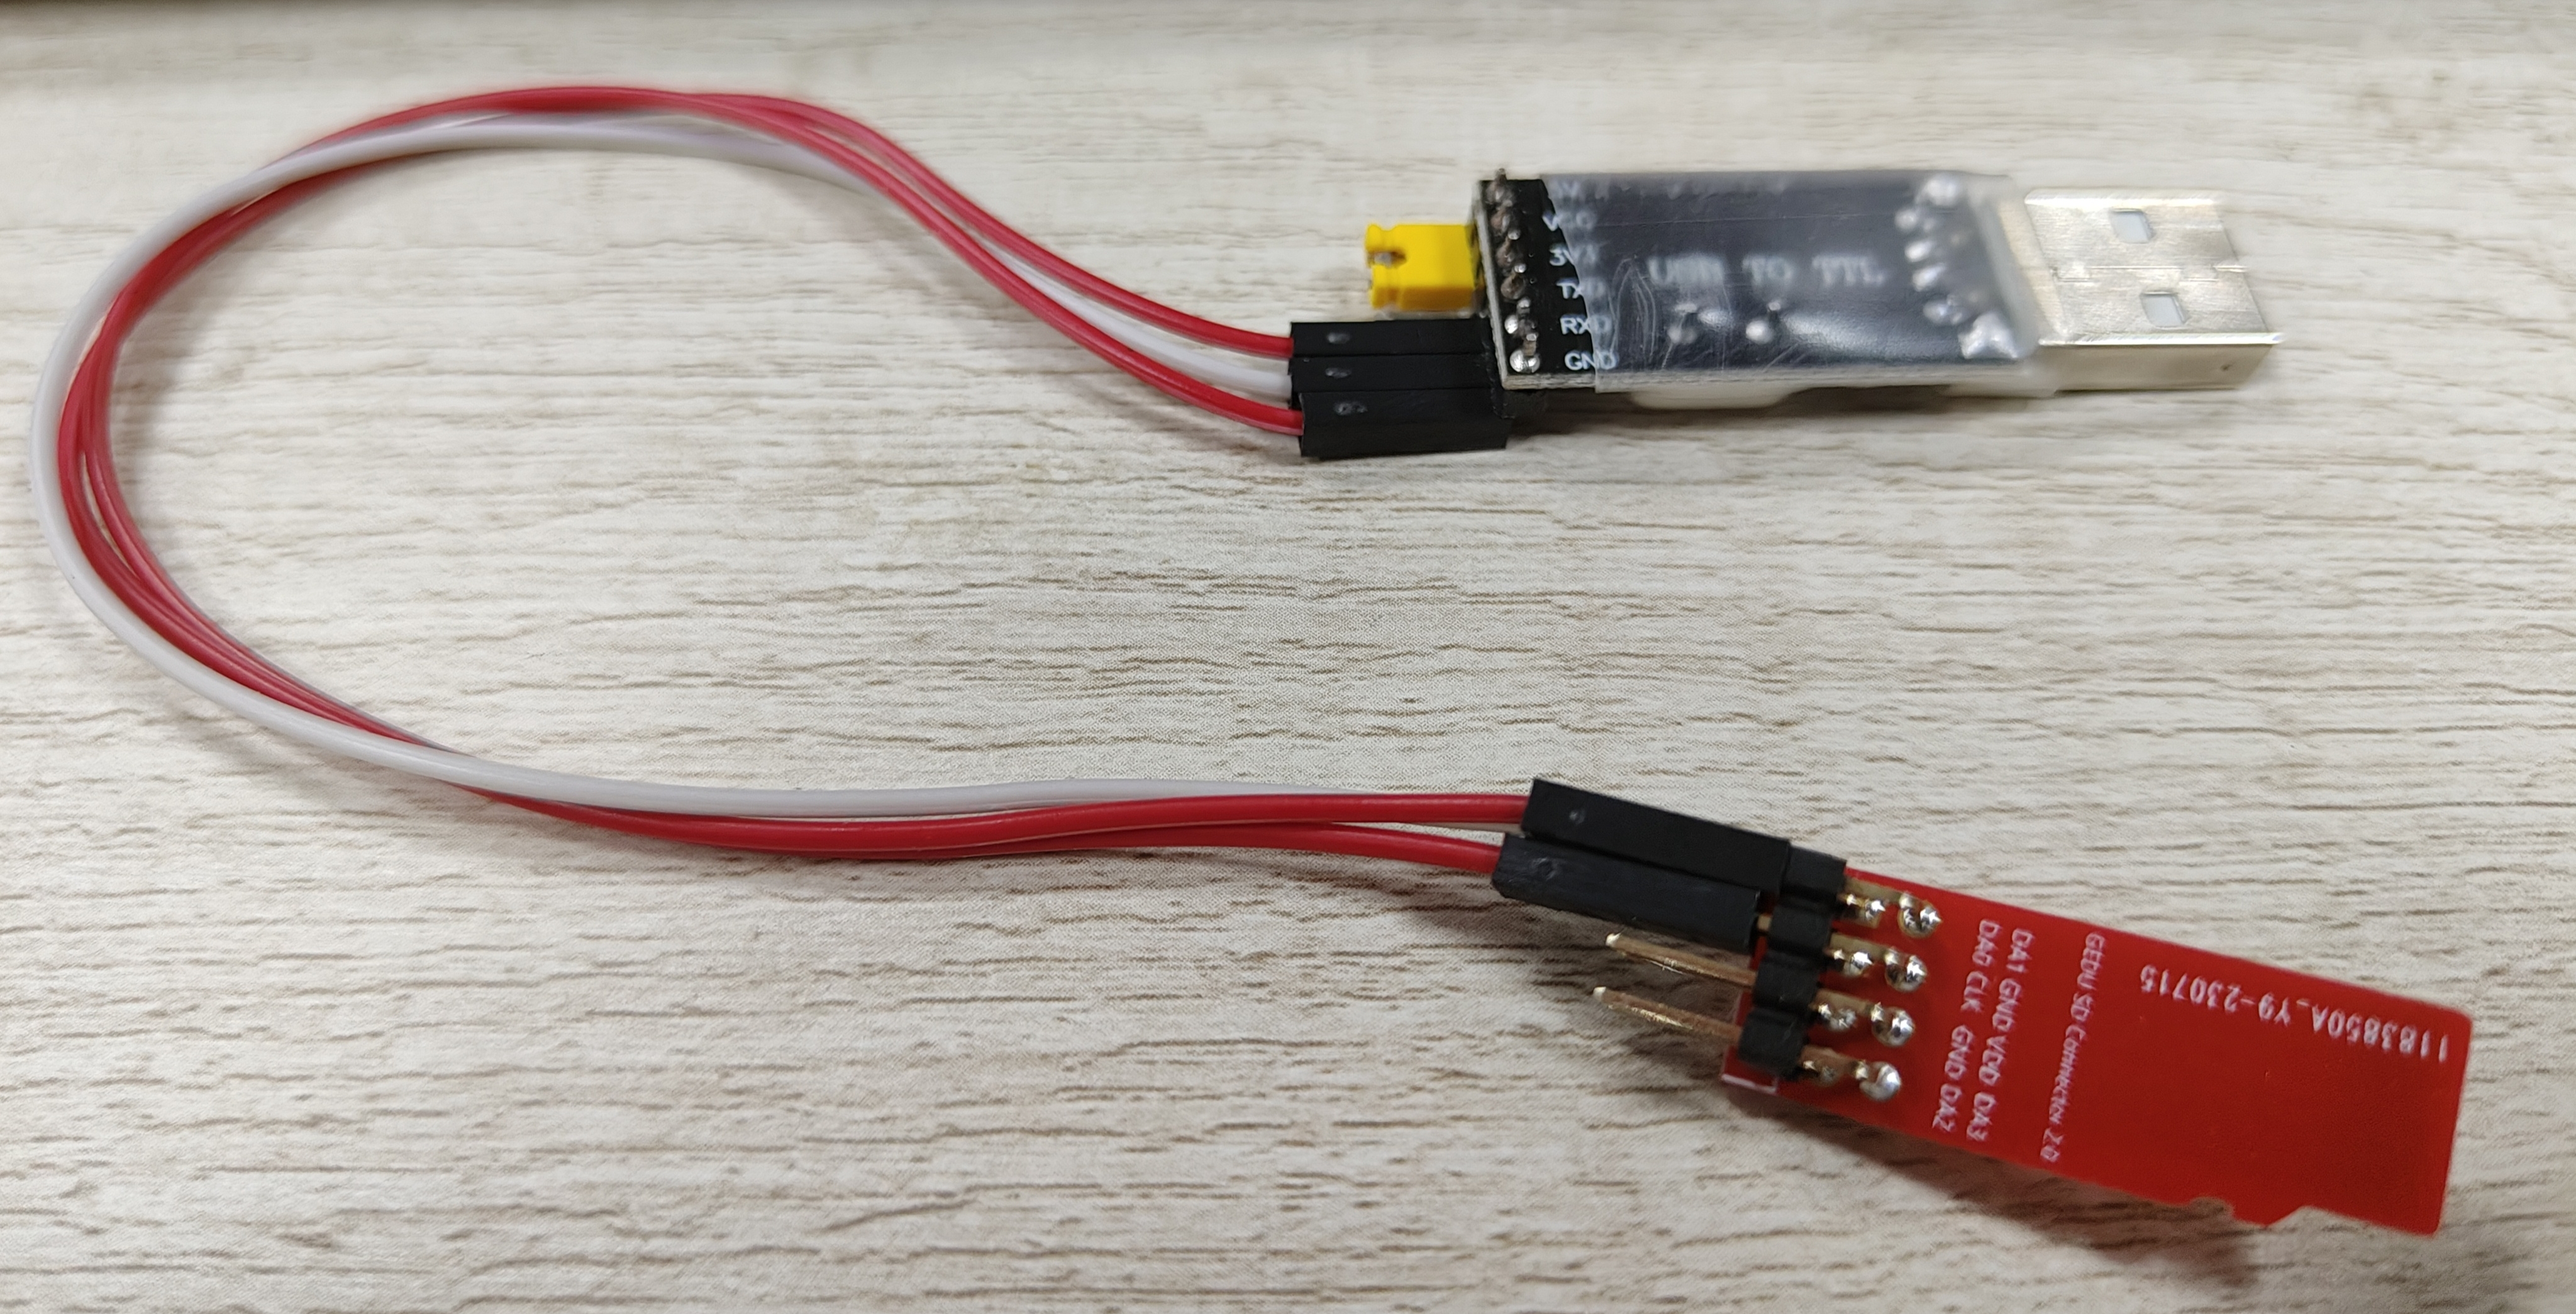
注意加粗字体!
其中GND TX RX在串口转接板上应有标注,在SD卡转接板中,GND有明确的标注,而D0是TX,D1是RX。
波特率:1500000
3. 启动串口信息接收软件
完成上图的连接后,打开串口终端,下面以MobaXterm为例进行设置。
完成设置后点击OK,打开串口会话,然后重启幽兰,这时就可以在串口会话内看到打印的信息。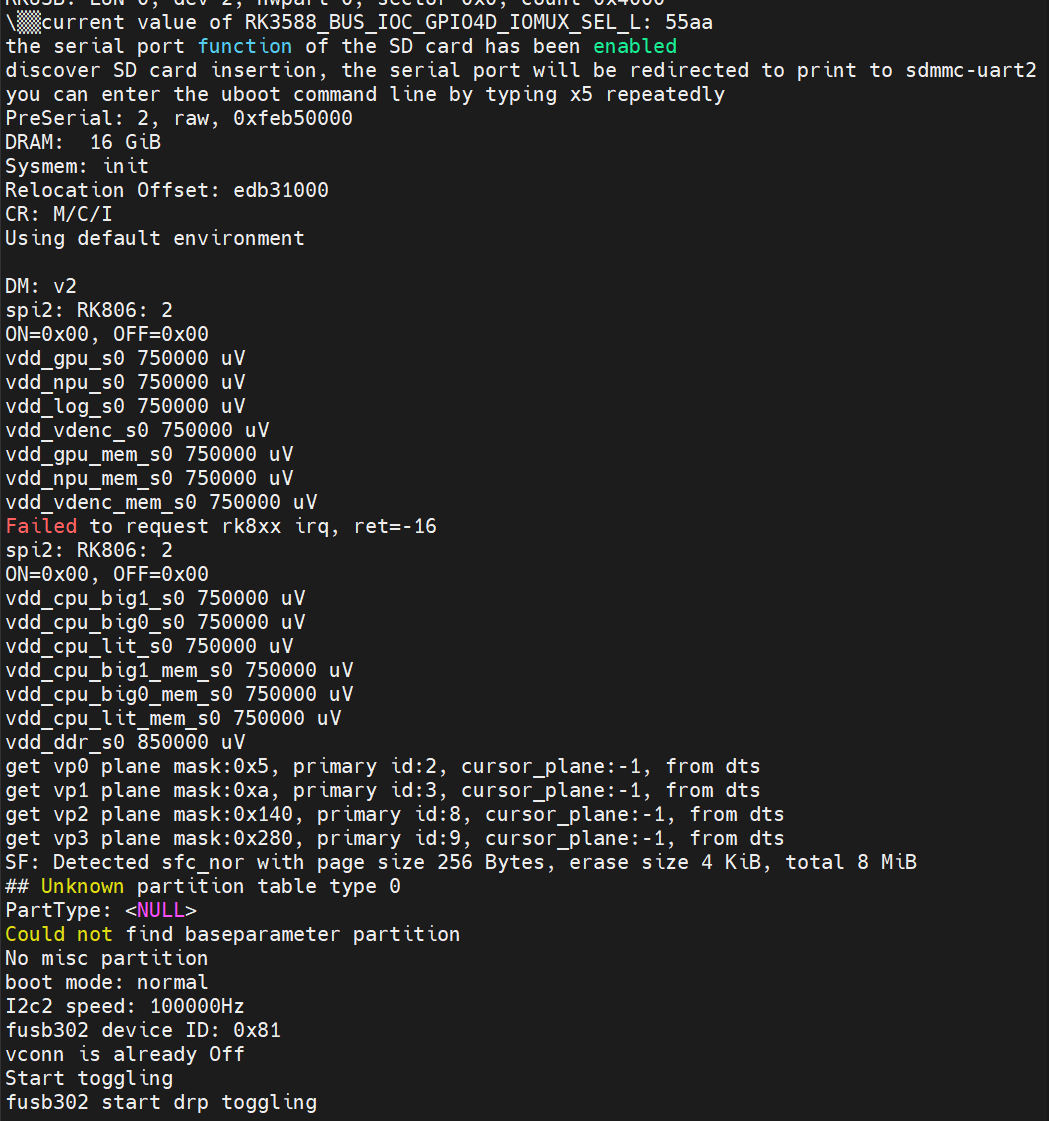
如果想要进入UBoot命令行,那么就需要在设备启动时,一直在串口会话内输入x5进入命令行。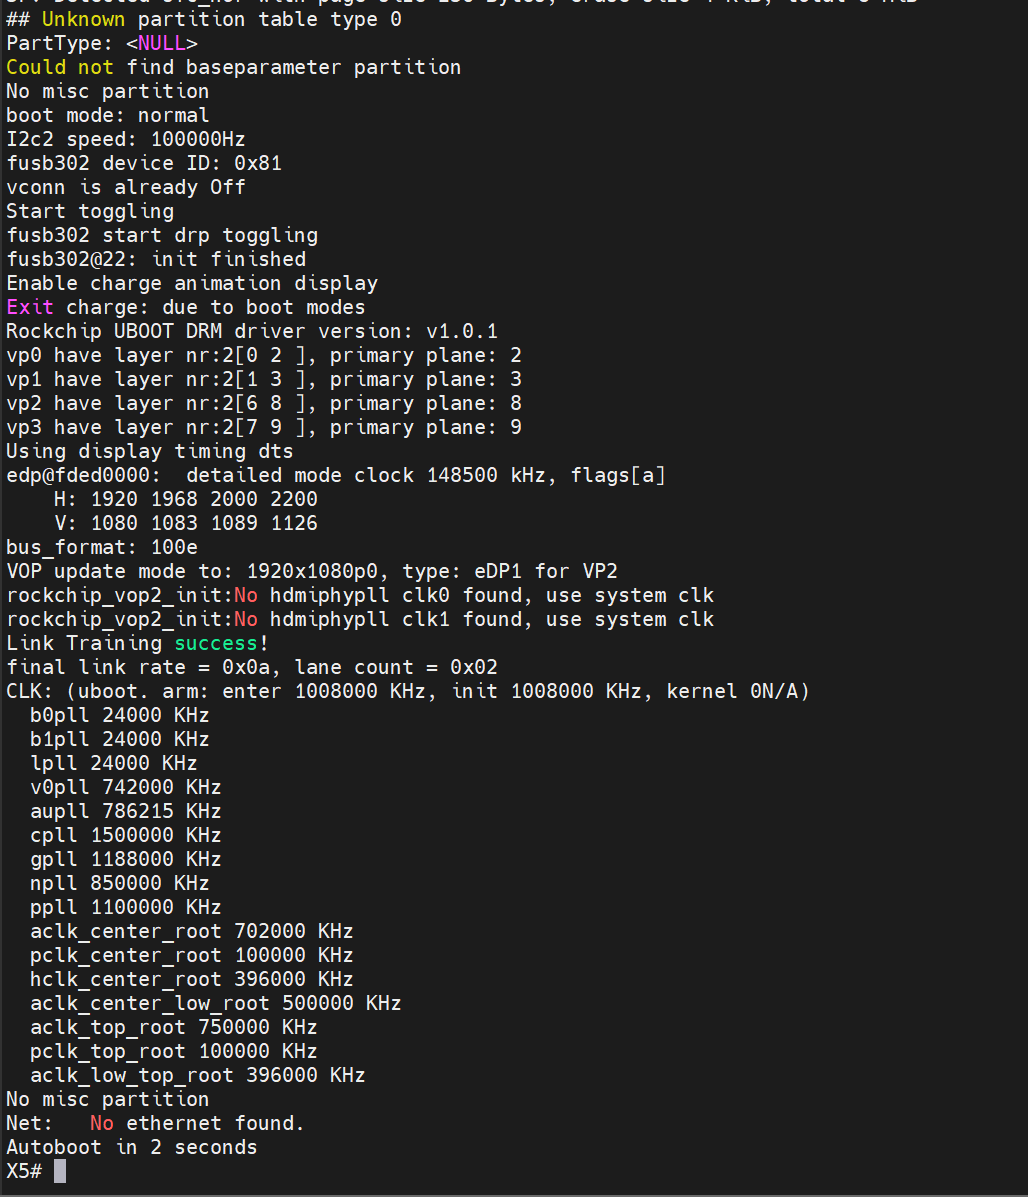
下面是串口打印出来的UBOOT和内核信息
//UBOOT信息
▒▒current value of RK3588_BUS_IOC_GPIO4D_IOMUX_SEL_L: 55aa
the serial port function of the SD card has been enabled
discover SD card insertion, the serial port will be redirected to print to sdmmc                                                                                     -uart2
you can enter the uboot command line by typing x5 repeatedly
PreSerial: 2, raw, 0xfeb50000
DRAM:  16 GiB
Sysmem: init
Relocation Offset: edb31000
CR: M/C/I
Using default environment

DM: v2
spi2: RK806: 2
ON=0x00, OFF=0x00
vdd_gpu_s0 750000 uV
vdd_npu_s0 750000 uV
vdd_log_s0 750000 uV
vdd_vdenc_s0 750000 uV
vdd_gpu_mem_s0 750000 uV
vdd_npu_mem_s0 750000 uV
vdd_vdenc_mem_s0 750000 uV
Failed to request rk8xx irq, ret=-16
spi2: RK806: 2
ON=0x00, OFF=0x00
vdd_cpu_big1_s0 750000 uV
vdd_cpu_big0_s0 750000 uV
vdd_cpu_lit_s0 750000 uV
vdd_cpu_big1_mem_s0 750000 uV
vdd_cpu_big0_mem_s0 750000 uV
vdd_cpu_lit_mem_s0 750000 uV
vdd_ddr_s0 850000 uV
get vp0 plane mask:0x5, primary id:2, cursor_plane:-1, from dts
get vp1 plane mask:0xa, primary id:3, cursor_plane:-1, from dts
get vp2 plane mask:0x140, primary id:8, cursor_plane:-1, from dts
get vp3 plane mask:0x280, primary id:9, cursor_plane:-1, from dts
SF: Detected sfc_nor with page size 256 Bytes, erase size 4 KiB, total 8 MiB
## Unknown partition table type 0
PartType: <NULL>
Could not find baseparameter partition
No misc partition
boot mode: normal
I2c2 speed: 100000Hz
fusb302 device ID: 0x81
vconn is already Off
Start toggling
fusb302 start drp toggling
fusb302@22: init finished
Enable charge animation display
Exit charge: due to boot modes
Rockchip UBOOT DRM driver version: v1.0.1
vp0 have layer nr:2[0 2 ], primary plane: 2
vp1 have layer nr:2[1 3 ], primary plane: 3
vp2 have layer nr:2[6 8 ], primary plane: 8
vp3 have layer nr:2[7 9 ], primary plane: 9
Using display timing dts
edp@fded0000:  detailed mode clock 148500 kHz, flags[a]
    H: 1920 1968 2000 2200
    V: 1080 1083 1089 1126
bus_format: 100e
VOP update mode to: 1920x1080p0, type: eDP1 for VP2
rockchip_vop2_init:No hdmiphypll clk0 found, use system clk
rockchip_vop2_init:No hdmiphypll clk1 found, use system clk
Link Training success!
final link rate = 0x0a, lane count = 0x02
CLK: (uboot. arm: enter 1008000 KHz, init 1008000 KHz, kernel 0N/A)
  b0pll 24000 KHz
  b1pll 24000 KHz
  lpll 24000 KHz
  v0pll 742000 KHz
  aupll 786215 KHz
  cpll 1500000 KHz
  gpll 1188000 KHz
  npll 850000 KHz
  ppll 1100000 KHz
  aclk_center_root 702000 KHz
  pclk_center_root 100000 KHz
  hclk_center_root 396000 KHz
  aclk_center_low_root 500000 KHz
  aclk_top_root 750000 KHz
  pclk_top_root 100000 KHz
  aclk_low_top_root 396000 KHz
No misc partition
Net:   No ethernet found.
Autoboot in 2 seconds
switch to partitions #0, OK
mmc0(part 0) is current device
skip mmc partition operate.
switch to partitions #0, OK
mmc0(part 0) is current device
19185517 bytes read in 116 ms (157.7 MiB/s)
13281631 bytes read in 87 ms (145.6 MiB/s)
165808 bytes read in 4 ms (39.5 MiB/s)
Uncompressed size: 48769536 = 0x2E82A00
No misc partition
## Flattened Device Tree blob at 0x17000000
   Booting using the fdt blob at 0x17000000
  'reserved-memory' ramoops@110000: addr=110000 size=f0000
   Loading Ramdisk to ead26000, end eb9d095f ... OK
   Loading Device Tree to 00000000eacfa000, end 00000000ead257a9 ... OK
Adding bank: 0x00200000 - 0x08400000 (size: 0x08200000)
Adding bank: 0x09400000 - 0xf0000000 (size: 0xe6c00000)
Adding bank: 0x100000000 - 0x3fc000000 (size: 0x2fc000000)
Adding bank: 0x3fc500000 - 0x3fff00000 (size: 0x03a00000)
Adding bank: 0x4f0000000 - 0x500000000 (size: 0x10000000)
get chosen bootargs: root=PARTUUID=614e0000-0000 rw rootfstype=ext4 net.ifnames=                                                                                     0 biosdevname=0 splash quiet plymouth.ignore-serial-consoles rootwait earlycon=u                                                                                     art8250,mmio32,0xfeb50000 console=tty0 wifibt=ap6275s:ttyS1, will send it to ker                                                                                     nel
== DO RELOCATE == Kernel from 0x00400000 to 0x14000000
Total: 4852.583 ms
//UBOOT信息

//内核信息
Starting YourLand kernel ...

I/TC: Secondary CPU 1 initializing
I/TC: Secondary CPU 1 switching to normal world boot
I/TC: Secondary CPU 2 initializing
I/TC: Secondary CPU 2 switching to normal world boot
I/TC: Secondary CPU 3 initializing
I/TC: Secondary CPU 3 switching to normal world boot
I/TC: Secondary CPU 4 initializing
I/TC: Secondary CPU 4 switching to normal world boot
I/TC: Secondary CPU 5 initializing
I/TC: Secondary CPU 5 switching to normal world boot
I/TC: Secondary CPU 6 initializing
I/TC: Secondary CPU 6 switching to normal world boot
I/TC: Secondary CPU 7 initializing
I/TC: Secondary CPU 7 switching to normal world boot
[    6.889766] fiq_debugger fiq_debugger.0: IRQ fiq not found
[    6.889818] fiq_debugger fiq_debugger.0: IRQ wakeup not found
[    6.889855] fiq_debugger_probe: could not install nmi irq handler
[    7.825016] mpp-iep2 fdbb0000.iep: allocate roi buffer failed
[    7.825947] rk-pcie fe150000.pcie: IRQ msi not found
[    7.825986] rk-pcie fe150000.pcie: Missing *config* reg space
[    7.826162] rk-pcie fe150000.pcie: Missing *config* reg space
[    7.826219] rk-pcie fe150000.pcie: invalid resource
[    7.829204] mpp_rkvdec2 fdc38100.rkvdec-core: shared_niu_a is not found!
[    7.829242] rkvdec2_init:1010: No niu aclk reset resource define
[    7.829272] mpp_rkvdec2 fdc38100.rkvdec-core: shared_niu_h is not found!
[    7.829302] rkvdec2_init:1013: No niu hclk reset resource define
[    7.830973] mpp_rkvdec2 fdc48100.rkvdec-core: shared_niu_a is not found!
[    7.831005] rkvdec2_init:1010: No niu aclk reset resource define
[    7.831034] mpp_rkvdec2 fdc48100.rkvdec-core: shared_niu_h is not found!
[    7.831063] rkvdec2_init:1013: No niu hclk reset resource define
[    7.837549] mpp_iommu_probe:434: failed to get device node
[    7.837582] mpp_av1dec av1d-master: failed to attach iommu
[    7.957185] rk806 spi2.0: no sleep-setting state
[    7.957229] rk806 spi2.0: no reset-setting pinctrl state
[    7.957261] rk806 spi2.0: no dvs-setting pinctrl state
[    7.996977] rk806 spi2.1: no power-off pinctrl state
[    7.997018] rk806 spi2.1: no sleep-setting state
[    7.997048] rk806 spi2.1: no reset-setting pinctrl state
[    7.997080] rk806 spi2.1: no dvs-setting pinctrl state
[    8.270946] cw2017 2-0063: Failed to register power supply
[    8.293765] bq25700-charger 2-006b: Invalid or missing extcon dev1
//内核信息
附录
如果你的幽兰很久没有升级过,那么可能无法接收到串口打印信息,我们建议你升级到最新的版本,比如至少升级到双剑版本。
以下是过失的升级方式,留作历史记录,请不要再使用,有问题,请在兰舍群里交流。
上位机烧录要求:
由于瑞芯微官方工具的限制,目前仅支持使用Windows或Linux系统对幽兰进行烧录。
Linux烧录工具要求版本在v2.17以上。
上位机串口信息查看要求:
能运行任一串口查看工具的操作系统均可。
下面的操作会以Windows操作系统为例。
2.工具及固件清单
下载到上位机:
瑞芯微官方工具
Windows版本下载链接:https://gedu.oss-cn-beijing.aliyuncs.com/Products/YourLand/Release/HeMing3/patches/SDMMC_Uart2_Support/v1.0/RockChip.zip
UBoot固件下载链接:https://gedu.oss-cn-beijing.aliyuncs.com/Products/YourLand/Release/HeMing3/patches/SDMMC_Uart2_Support/v1.0/UBootUpdate.zip
下载到幽兰下位机:
鹤鸣3的朋友需要下载,已经是秀峰的不需要再下载。
3.驱动安装
Windows上位机操作:
解压下载好的瑞芯微官方工具压缩包,进入PATH\To\DriverAssitant\DriverAssitant_v5.1.1目录,运行DriverInstall.exe,然后先点击【Uninstall Driver】,再点击【Install Driver】,完成驱动的安装。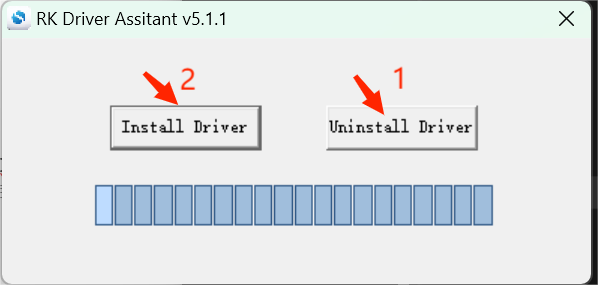
4.内核更新
幽兰下位机上操作:
将下载好的内核固件压缩包在幽兰上解压tar -zxvf KernelUpdate.tar.gz,然后进入刚刚解压好的目录内,运行sudo ./update.sh脚本进行更新。
5.上 / 下位机连接
找一根【USB Type-A To USB Type-C】的线缆一根,将Type-A端连接到Windows上位机,再将Type-C端连接到幽兰下位机,如下图。
6.UBoot更新
幽兰下位机上操作:
进入命令行,输入sudo reboot loader,运行该命令准备更新UBoot。
Windows上位机内操作:
将下载好的UBoot固件压缩包,其中有需要烧录的3588_loader.bin和uboot.img固件。进入刚刚下载的RockChip文件里的PATH\To\RKDevTool\RKDevTool_Release_v2.93目录下,打开RKDevTool.exe,此时会发现Loader设备已经被识别出来。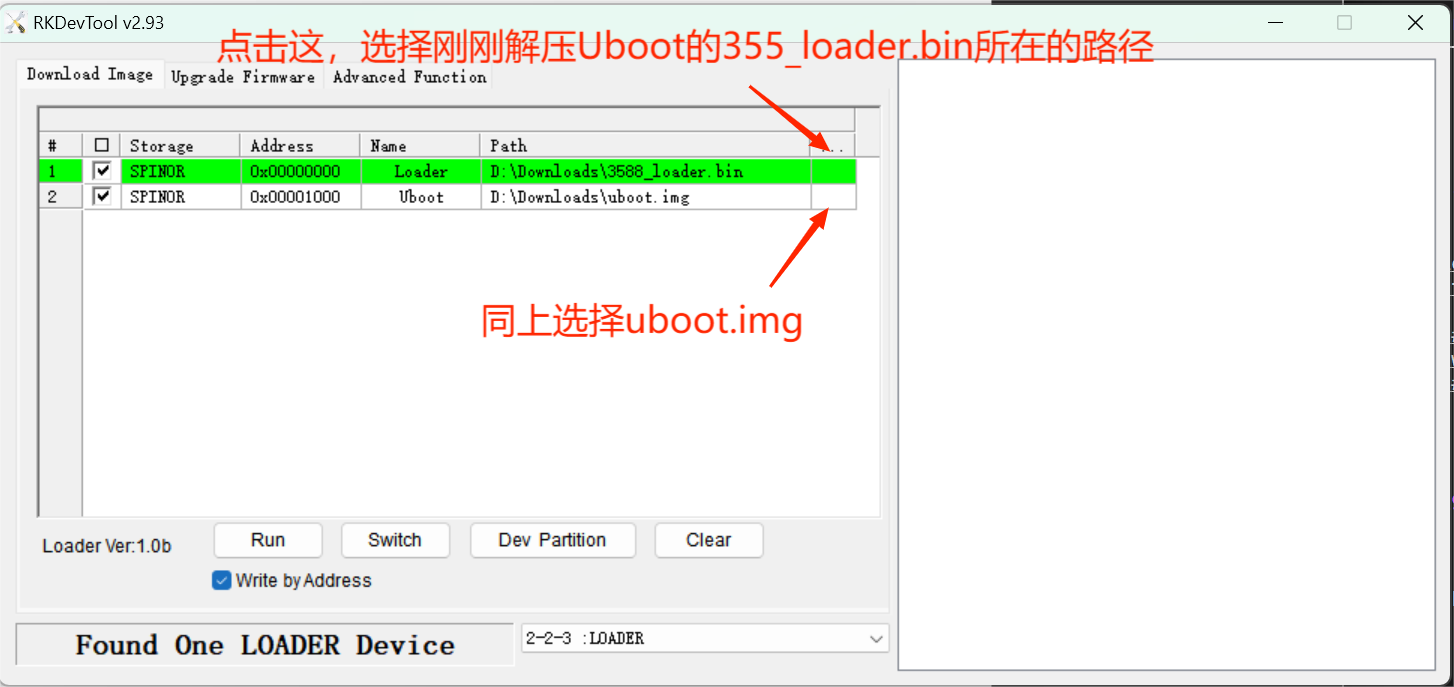
在开发工具的Download Image界面下,添加Loader和Uboot两个分区,存储设置为SPINOR,Loader的地址设置为0x00000000,Uboot的地址设置为0x00001000,最后选择对应的文件,Loader对应选择3588_loader.bin,Uboot对应选择uboot.img。
选择强制按地址写【Write by Addriess】。
完成上面的设置后,点击Run,等待烧录完成(出现Download image OK)。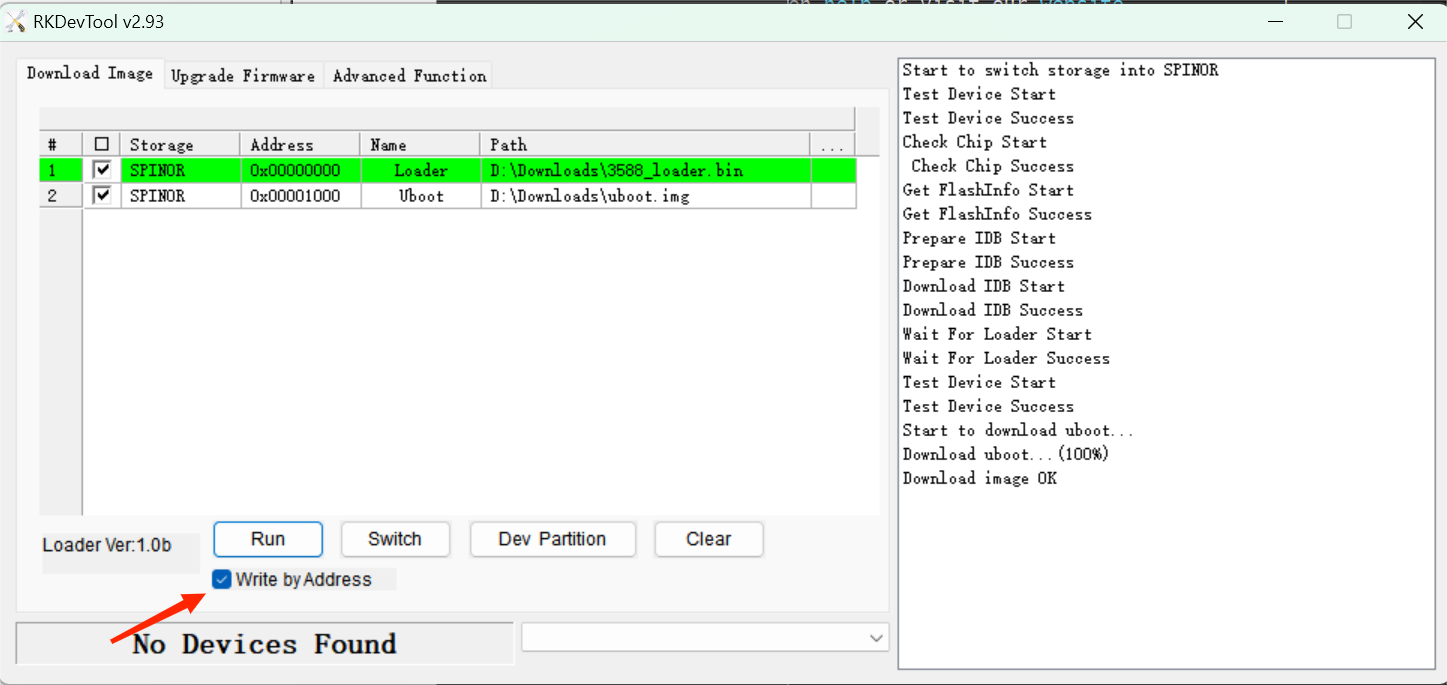
机器在完成烧录后会继续完成启动,知道进入登录界面。
最后编辑:Zhang Yinkui 更新时间:2025-04-21 15:23
